I haven't quite gotten used to the idea of Louisiana being home. For me, Southern California will probably always be home. It's where I was born and raised, its where my friends and family are...and though it has its issues...it is an amazing place. Times like now I am especially wishing I was there to help a friend in mourning.
I met Andy and his wife Anne a few years ago. I contacted Andy because he did an internet show about auto racing and I wanted to get the driver I represented on the show (I was doing marketing for my dad's NASCAR team). Andy so kindly not only had the driver on via phone conference, but he asked me to come on too in person. Andy turned out to be a huge supporter of the race team. Anne (a photographer) took some pictures of the car for us and allowed us to use them for whatever we needed.
Then Anne and Andy received devastating news...Anne had breast cancer. Not one to be brought down, Anne still did her photography...she still went to the races with Andy. My mom invited her into our trailer during a race day to cool off and get some food and drinks. My mom, no stranger to the horrors of cancer (lost 3 close family members in a short period of time), decided to pay tribute to the race fans who had cancer:survivors, those who were still fighting, and those who lost their battle. Anne was given a sticker on the car with her name and the breast cancer awareness ribbon. The car now has 60 names and ribbons on it with the simple slogan "Beat Cancer." If you would like more information on this...please click here: Beat Cancer.
Although he had his own problems to worry about, Andy was such a good friend in my family's time of need. My mom had a couple of strokes and gall bladder surgery and Andy so kindly offered to drive my mom to the hospital if needed, or help in anyway. Andy also recently lost his brother very suddenly.
And now...Anne has lost her long battle with breast cancer. My heart breaks for Andy and all the people who loved her. I know Anne is no longer suffering and that probably gives a little comfort. But I know she will be greatly missed. I am very sad that I'm not back home to help my friend, Andy. I wish I could be there for him, like he was for me and my family. Anne was a beautiful and talented woman...she was 40 years old. And cancer took her away too soon. :(

Adventures in all things mom/housewife. Stay at home parent tips on organization, cooking, cleaning, activities, etc. :) Lets all share and be positive!
Monday, May 28, 2012
Tuesday, May 22, 2012
Special Wedding Gift
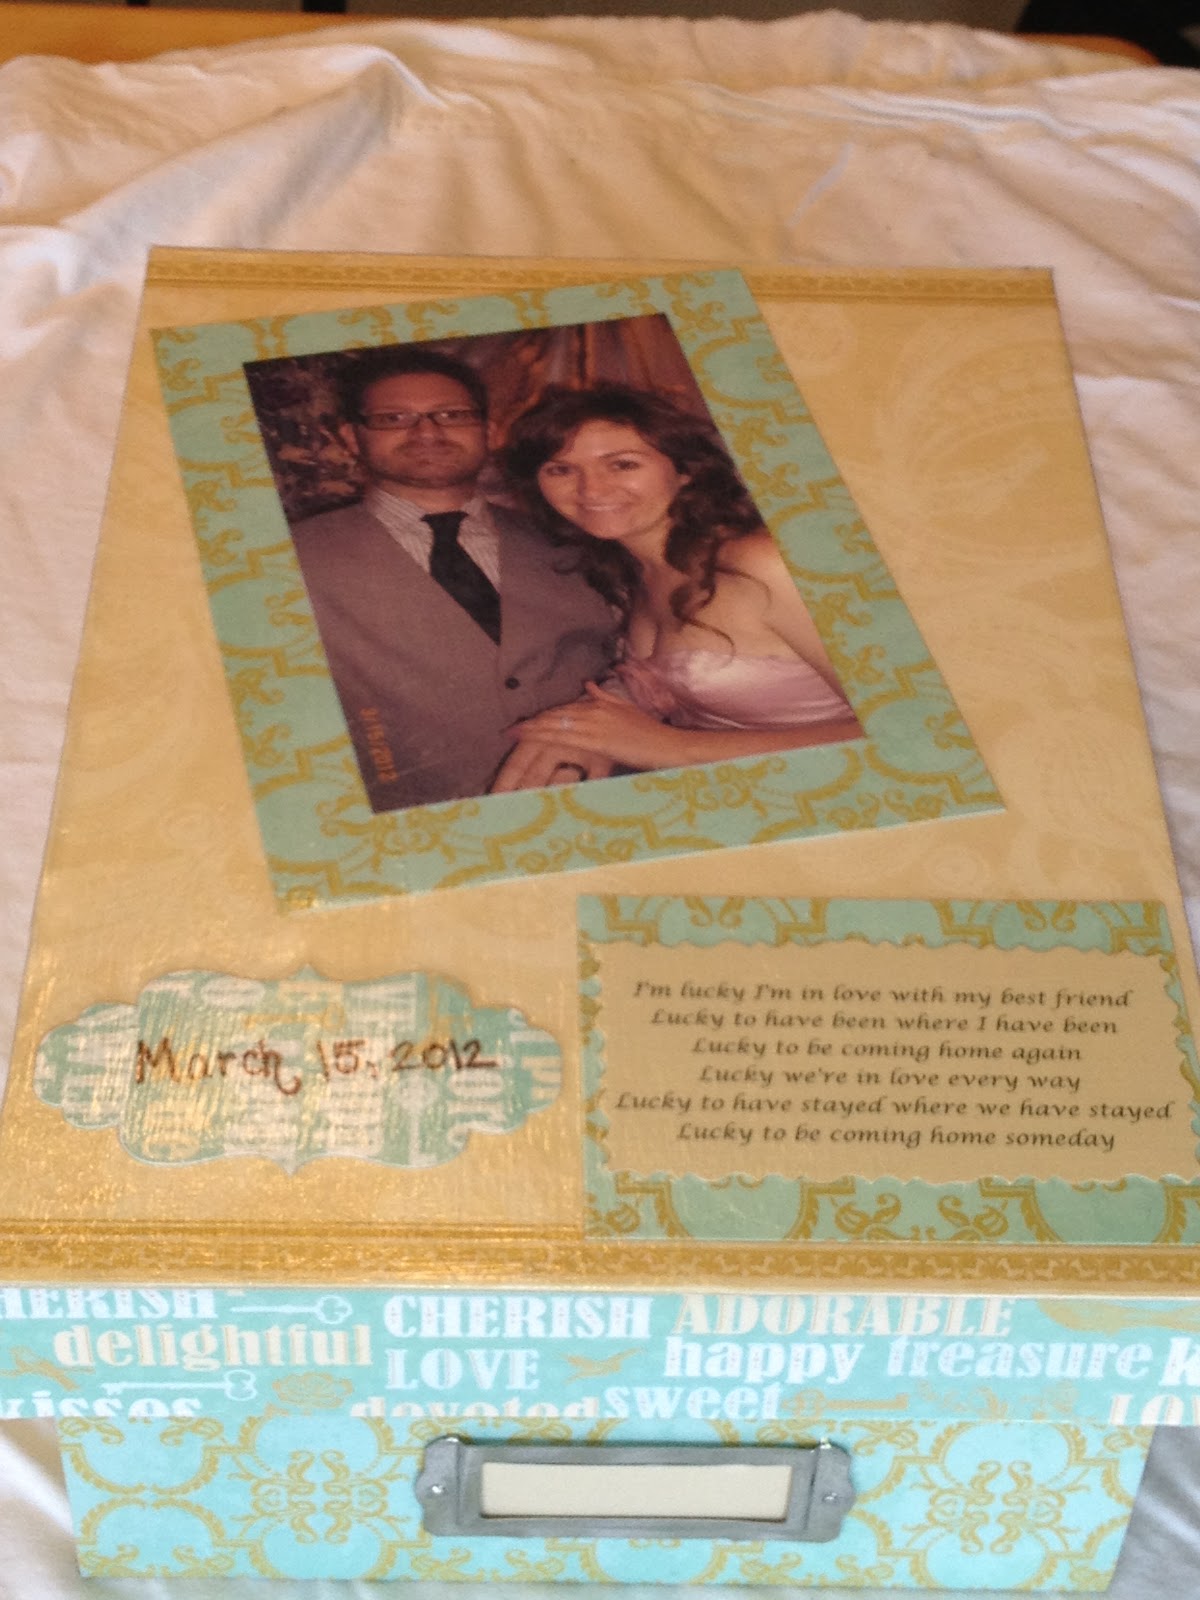
I start with a wood photo box that I get from Micheal's...but I'm sure other craft stores have them as well. You can use a cardboard box as well...but the wood is much stronger and won't get crushed.
I remove the metal piece on the front (where you can slide in a tag)...makes it easier to decorate. Then I sand the entire thing, inside and out. Next I paint a few coats of paint in areas that I am not going to cover with paper. On this one, I painted the inside....but sometimes I paint the outside too.

For this one I covered the entire lid with one piece of scrap book paper. To do this, I cover the lid with Mod Podge using a sponge applicator. I prefer the sponge to a brush because I don't like brush marks. Then I put a layer of Mod Podge on the paper I am using.


Next I seal the lid with a coat of Mod Podge on top of the paper.


Sunday, May 20, 2012
Decorative Candy Jars
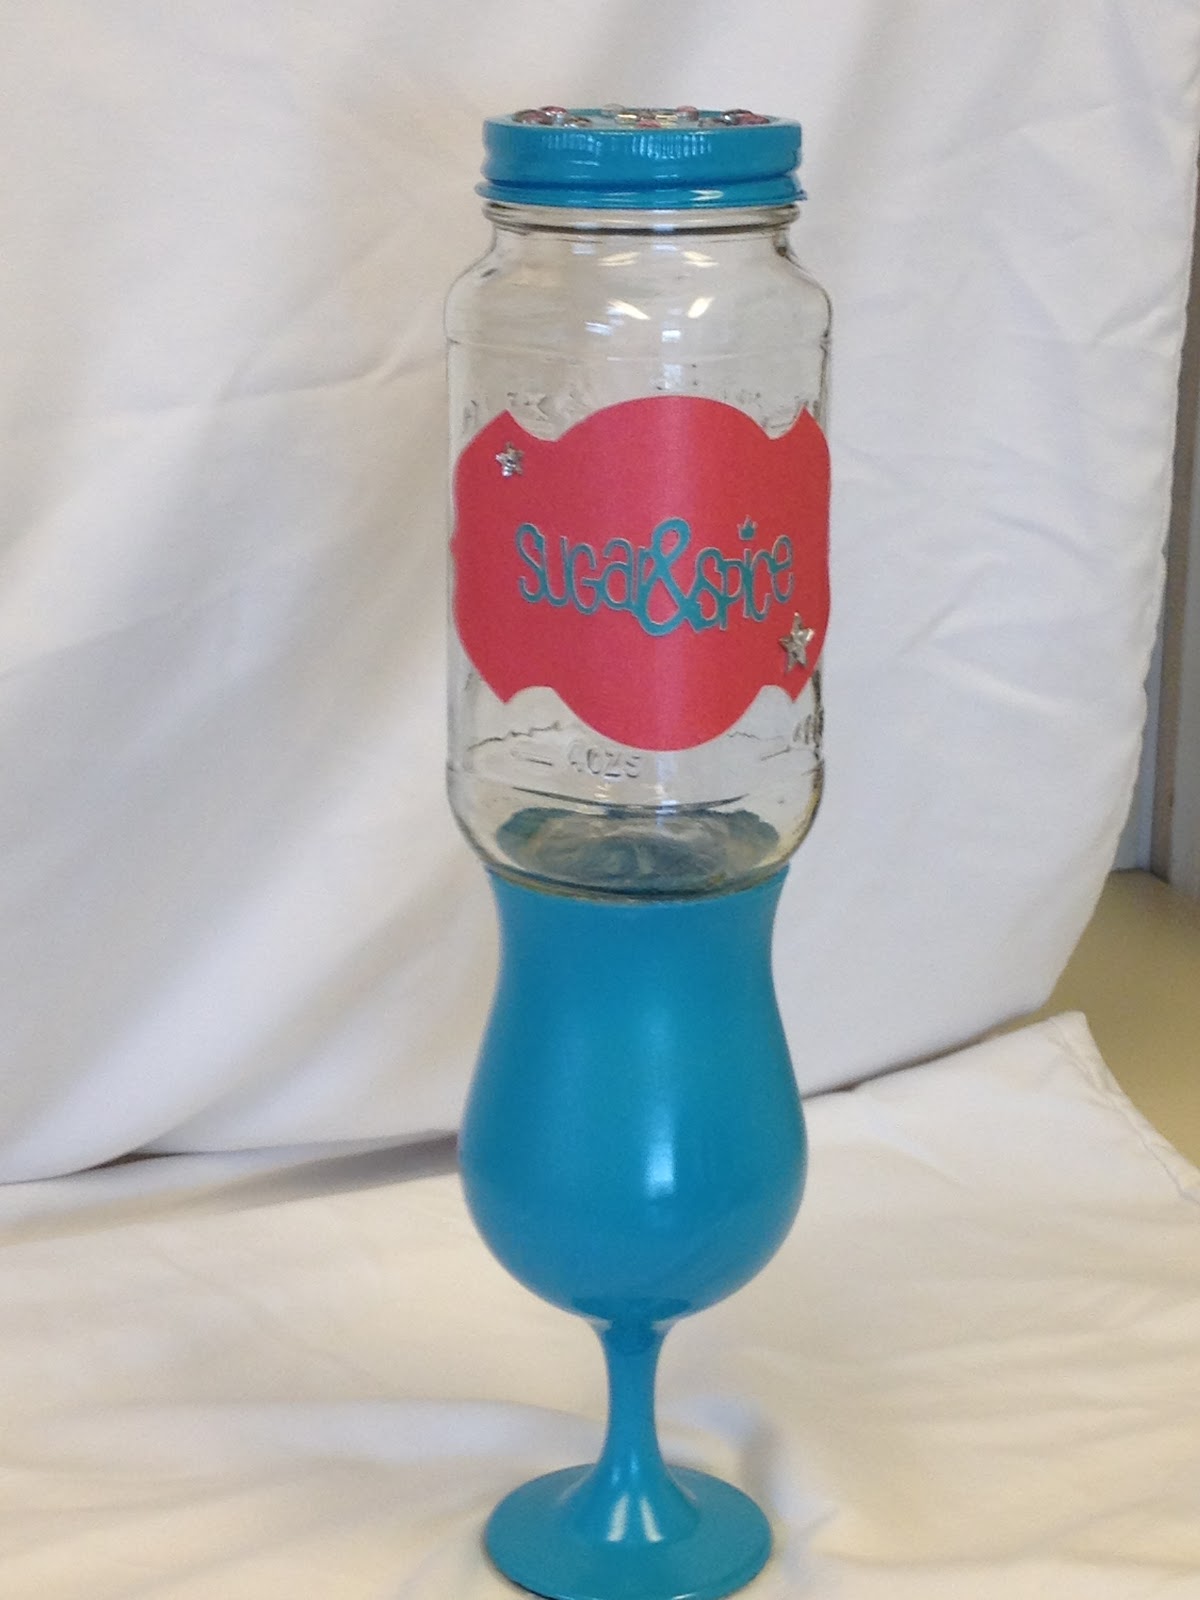
Recycling is cool...but Re-Purposing is even better! I've been saving up mason jars and I found this really cute way to display them as candy jars. This is just the first of more to come because I really enjoyed making this. This one is available for sale on Love My Rose. It can be personalized as well...just tell me the name or occasion.


UPDATE: I promised I would make more and I have a few in the works. I went to the candy store for some inspiration....and here is my latest available for sale here: Soda Pop Candy Jar
The jar sits atop a small Coca-Cola glass I found and spray painted. It has a little rock-n-roll edge with the paper embellished with guitars. Perfect for the Cola lover...their favorite cola flavored treat is close by!


Tuesday, May 8, 2012
Strawberry Baby Girl Memory Box


I loved making this box! I think it is one of my better items. :) It includes a wood frame on the box top so the buyer can add a baby photo. The glass jars for baby's first curl and baby's first tooth are re-purposed baby food jars...with lids painted with chalkboard paint to personalize with a name, date, or message.
This would make a great baby shower gift or gift for a 1st Birthday.
It is available for sale on Etsy Strawberry Baby Box
Love My Rose Shop
If you see any of my items that you would like to purchase, they are available on Etsy. :) You can also request custom items and I will do my best.
Love My Rose on Etsy
Love My Rose on Etsy
Chalkboard Toy Box

My dogs needed a toy box...I needed to test out my technique with chalkboard paint...and an idea was born. I have been saving all of Liv's diaper boxes. I used them initially when we moved, but those are gone. I knew these things would come in handy for something.
I cut off the top flaps, laid out some newspaper, and used my chalkboard spray paint (outside of course). They key to chalkboard paint is to not spray too much at a time. Do very thin layers and let it dry a little before spraying again. Too much makes it puddle and dry funny.
After allowing the paint to completely dry (the instructions suggest 24 hours), I used some duct tape I had bought and never used to decorate the box. Viola! Project complete. This was very easy to do. BUT if you are not crafty and still want one for yourself (organizing, dog toys, magazines, kids toys, newspapers, books)...I would be happy to make one for you. I have different sized boxes and the decorating possibilities are endless. Then you can write with chalk what you are using the box for, and changing its purpose is easy! You can even use it instead of a gift basket and put the recipient's name on it and a message.
If you would like one, just let me know and I am happy to do it for $6 plus shipping. I am going to pre-make a few and put them up on Etsy as well. :)

Made this one for my geek :) using wrapping paper and Mod Podge

Available for Sale: Love My Rose
Monday, May 7, 2012
Gator Park and the Bayou Billionaire

That is a real gator and my daughter trying to kiss it
We went with some friends to the local attraction Gator and Friends. It's an alligator park and petting zoo (yes...you can pet a gator). Before our trip, I took a look at the web site to see what we may be in for. There, they had a list of gator feeding times...and to my surprise, I learned that gators do not eat all year long. Apparently, when the temperature drops, they do not eat. So from fall to about mid April the gators won't chow down. After the gator feeding, you can actually hold a smaller, live gator (with his mouth taped so that you don't lose fingers).
Now I know there are people who disagree with zoos and these types of activities (especially in California), but in Louisiana, things are much different. People do things like go frog gigging (hunting a frog with a stick), then eating the frog legs. And to my surprise (and admittedly horror), some people are actually not fond of the Chimpanzee Haven I spoke about in an earlier post. Recently, Bob Barker (from the Price is Right) donated a large sum of money to the Chimpanzee Haven and people actually berated him for wasting his money on animals. I do not agree with those people...for the record. I think it is a wonderful thing he did. Back to my point...I think zoos and petting zoos are a great learning experience for people (if they are humane). I love taking Olivea to see different animals, touch them, smell them, and learn about what they do and the sounds they make. And this experience is paying off. While we were petting some goats, she began to mimic the sound they make for the first time.
I was pleasantly surprised by the size of the park and how many animals they had. There were so many gators! Big ones, small ones, medium ones...swimming, sun bathing. There is an eerie calmness to alligators that is a little unsettling. And these ones know when it is time for food. They start circling the area where the guy throws the food off a bridge.

This is only a small portion of the gators' home
There were other animals too. Many deer, goats, small cows, llamas, lemurs, kangaroos, an ostrich and an emu, and a baby zebra and baby camel. The baby camel, named Brownie, was my favorite. For $2 they give you a huge cup of feed. The animals are in pins, so you are not bombarded, but you can walk down the dirt path and take your time feeding and petting the animals. For two people and a baby, we spent less than $20 on admission and feed. I thought this was a good deal.

Brownie the baby camel only 3 months old

Petting a deer
Thursday, May 3, 2012
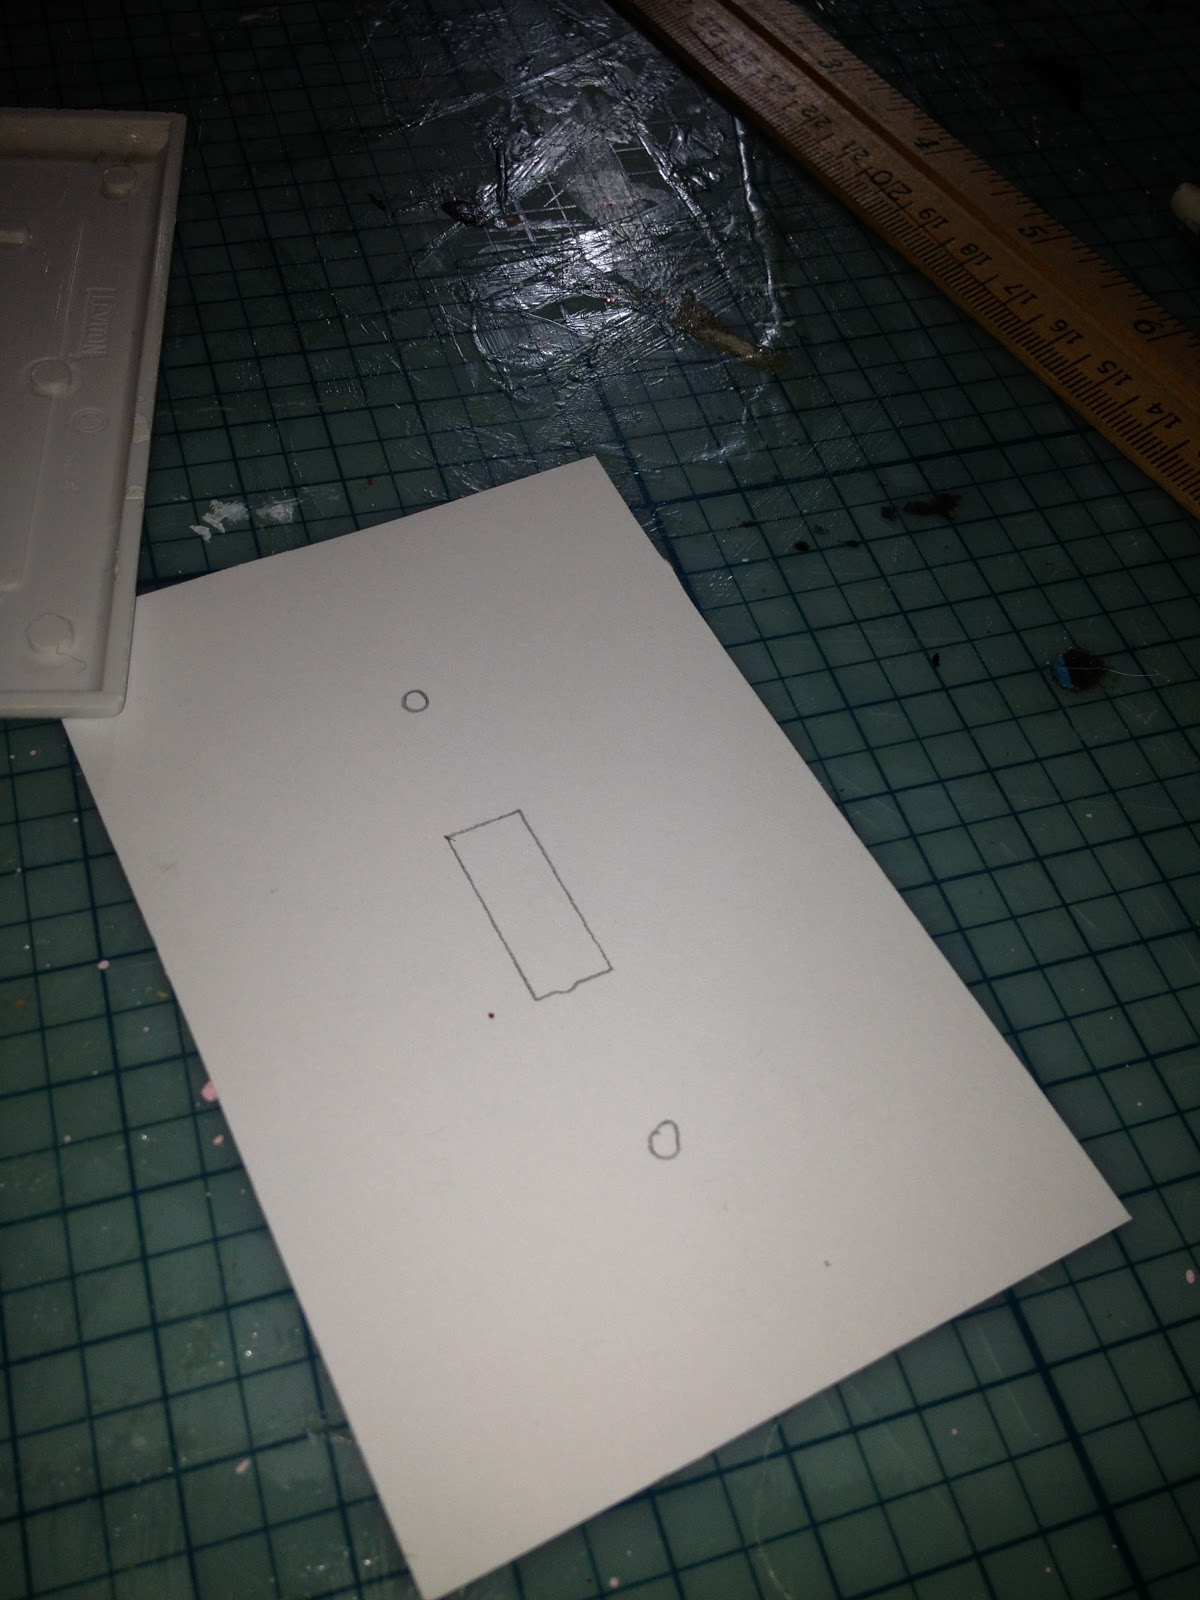
Light Switch Cover

My favorite craft supply is Mod Podge. I think I can do just about anything with it. I recently painted my daughter's room...and when I removed the light switch cover, I noticed it was cracked (not by us..who ever lived here before us did it). Anyway...I could not allow such a beautiful paint job to be tainted by an ugly switch cover...and with only one income I don't really want to spend $5-$10 on a designer one. So I broke out my scrapbooking paper, mod podge, and a few embellishments.
Items you will need:
- Cutting mat
- Xacto knife or paper slicer
- Ruler
- Pencil
- Mod podge
- sponge applicator brush
- paper (any kind will do, I used scrapbook paper, but you can use tissue paper, wrapping paper, or even a photo)
- embellishments (I used a chip board saying and small jewels)
- Brayer
Remove the switch cover from the wall. Using a pencil, outline the cover onto the back of your paper, including the cut out for the switch and screws. Use the Xacto knife and ruler to carefully cut your paper. Dip yor sponge applicator in the mod podge and apply a layer to the front of the switch cover and the back of the paper. Place your paper on the switch cover and align. Press the paper down then use a brayer to roll out all the bubbles. If you don't have a brayer, you can use a popsicle stick. Apply 2 more coats of mod podge onto the paper and stick on any embellishments. Allow to dry completely then spray with a light coat of polyurethane. The mod podge sometimes stays tacky, and the spray will keep that from happening.

Subscribe to:
Comments (Atom)